Made To Measure, Homemade Paint Recipes
![]()
- Posted by abrakadoodle.com.sg
- Categories Painting ideas for kids
- Date 17 June 2022
It has been proven beyond doubt that art has a dramatic and positive effect on children’s academic performance. Painting classes for children allow them to come alive and explore their senses: discovering colour, texture, smells, movements and images. As well as develop skills that are vital to language and math learning.
Once your child learns to hold a paintbrush and begins to work with it, she will be exercising her wrist and hand, developing finger strength. In other words, be able to grip a pencil correctly and begin to write sooner than her peers will.
As she draws shapes, makes swirls, and creates patterns, your child will be switching on the mathematical ideas in her brain and building new neural connections.
And as she begins to learn and mix homemade paints, and experiment with different types of paint and paper, she will discover what happens when more water is added. This way you are actually encouraging the budding scientist to design the first experiment on her own.
Painting is a joyful expression of your child’s inner feelings and thoughts. Of her creative thinking activities, her spirit, and her true personality.
Table of Contents
ToggleEasy-to-make, non-toxic paint
When you are having toddlers who enjoy playing with colours, do you ever experience deep down, that nagging worry about the ingredients in the paints the children are playing with? Especially when they are at an age when everything they’re playing with finds its way into their mouths?
You are not alone. Put an end to this fear, as it is simple and easy to make homemade paint that children can play with safely. Knowing that the ingredients that go into making homemade paints are entirely edible and harmless will be a great relief. Safe and inexpensive, these homemade paints work just as well as those that are bought from a store.
If your toddler loves painting regularly and it has become a part of your child’s creative activities, encourage your child to try something new. Bring out those homemade paints, grab a large sheet of paper, and invite your child to celebrate her creativity and expect some fabulous outcomes.
Here are a few ideas that will add a different twist to your easy homemade paint recipes and paint making experiments.
Homemade finger paint
The basic ingredients are flour and water, mixed in the ratio of 1 cup flour to 2 cups water. You can scale this up or down, depending upon how of paint you’d like to make. Use, washable, non-toxic liquid watercolours to add colour to the paint, but your best bet will be to use food colours for an equally similar effect.
Pour flour and water into a pot. Keep stirring this mixture until it dissolves to form into a smooth paste. When this mixture becomes easy to pull away, remove the pan from the heat, and add a little salt. This is important as it helps keep the mixture from spoiling.
Squeeze food colouring or liquid watercolours into the flour mixture until you reach the desired colour. Repeat the whole process until you have a set of homemade paint in different colours. Pour the paint into separate plastic bowls.
All you have to do when you are ready to use is add cold water. Just ¼ of a cup to the paint will be enough. Store the paint in covered containers in the fridge if you’re not planning to use them right away. It will keep indefinitely.
You will find the texture of these paints to be like mousse and will feel nice on the hands when cold. Painting it on their hands to make hand prints is an exciting way to get your child engaged. Later on, you can get your toddler to use a paintbrush to paint in the more traditional way.
Unlike synthetic paints, the pigment in a homemade paint you just made may not stick to the paper easily. If your child wants a brighter shade of colour, all she has to do is to apply the paint extra thick. After the paint dries, the colour will pop out just like poster paints do.
Generally speaking, all children will be more interested in the process of making something than in the final outcome. Relax and feel comfortable in the fact your child will agree that your homemade paint recipe will be for keeps!
Soft playdough that lasts For months
Very pliable, and fun to work with, your homemade playdough will be an ultimate sensory play material that your toddler will love. And since you have taken the time to make it at home, it will also be totally nontoxic. Read on to discover a fail-proof, absolutely safe play dough recipe that is so easy to follow.
It will be worth your while as you will be saving tons of money in the process. And the best part, you don’t have to worry if it gets onto the sensitive hands of young children nor fret if they happen to lick some of it while playing.
So here is the recipe in easy-to-follow steps. Mix 2.5 cups of wheat flour with 2.5 cups of filtered water. Add 1 ¼ cup of salt and 5 tablespoons of vegetable oil. Mix these ingredients thoroughly in a large pot, making sure that there are no lumps left. Place the pot on the stove and cook over a low flame. Stirring frequently with a large wooden spoon. The dough gets smoother as it cooks.
Keep mixing until the dough begins to dry out around the edges. Check by pinching a little of it, and see how it feels between your fingers. If it is not gooey, the dough is now ready for the colours.
Spread the dough on the counter or a large cutting board, wear gloves and start to knead the warm dough until it turns smooth. Divide the dough into four or six balls, depending upon the colours you want.
Add food colouring or liquid watercolours, making gorgeous shades of play dough to match any occasion, mood or toddler request. If you like a darker shade, add more colour until the desired shade is achieved.
You can use the coloured play dough right away or you can store the flattened balls in a ziplock bag. Put these away in the fridge, it will keep for months without spoiling. The perfect blend of salt, flour, and oil, means the dough is not sticky. It may feel a little greasy, but it will never stick to the fingers or hands.
Most everyone will like the sensory experience of working with play dough. It’s also a great stress buster for children of all ages and adults as well!
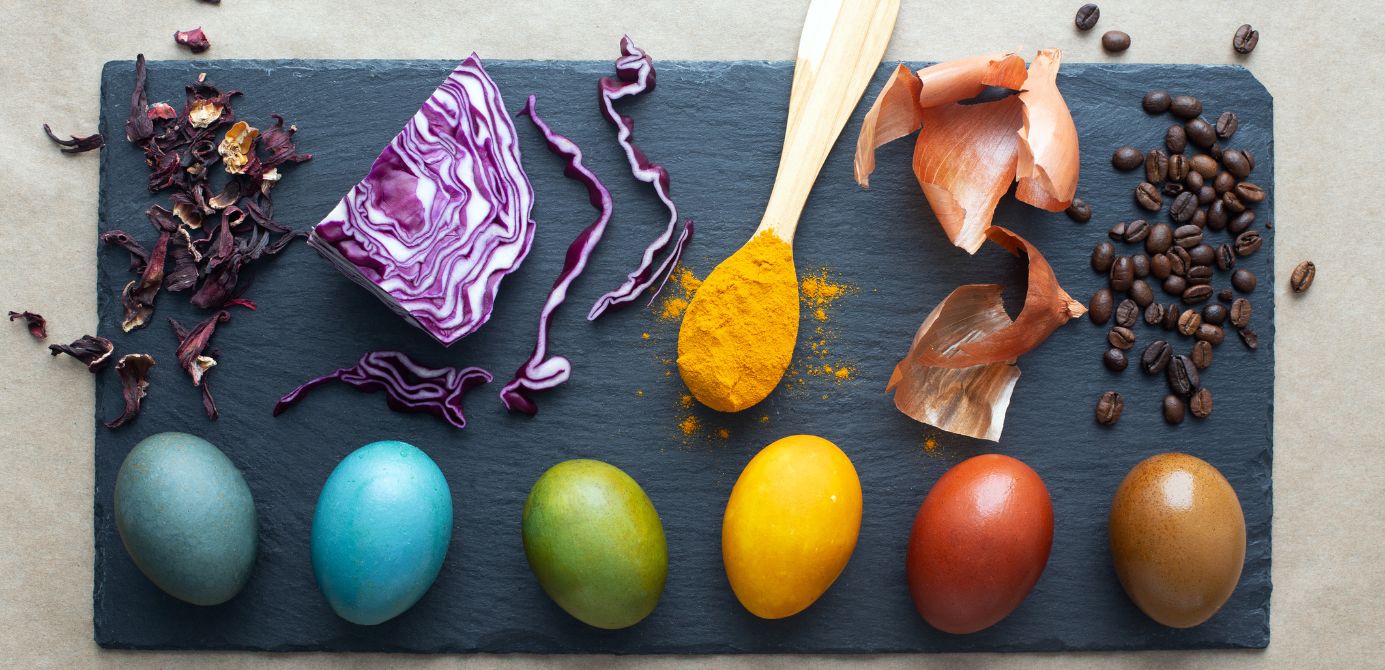
Homemade watercolour paints
Making your watercolour paints is a very affordable way to create your art supplies. You will also involve children in a creative, scientific process where they can experiment with different materials found in nature and provide a variety of unique colours.
To make your paints, start with collecting leaves, flowers, berries, spices, soil, and food colouring. Choose only items that you recognize and know are safe to use. Fill tiny plastic cups with water and then start experimenting with what you can add to create a range of colours to paint with.
Select petals of flowers like carnations, marigolds, and calendula. Collect soil from different locations, and gather the powder to mix with water.
Try mashing up separately berries such as raspberries, strawberries, and blackberries. Mix them with water and extract their dye, and then strain the coloured water into small jars before using.
Alternatively, raid the kitchen cupboard to gather spices to try, such as turmeric, ginger, or cinnamon. Dissolve them in water to create earthy colours. You will be surprised as to what nature and you can create.
Homemade bath paints
They are so easy to make at home. All you need is just two basic ingredients – shaving cream and food colours. The texture of this homemade bath paint is soft and the colours come out bright and beautiful.
The ideal container to mix the colours is an old muffin tin tray, use it as a palette with a choice of your colours.
Squirt a little shaving foam in each space of the muffin tin tray, and then stir in the food colour. You can also think of using food colouring gels, as you’d need to use a tiny bit each time.
Remember to leave a few empty spaces on the muffin tin tray palette, and encourage your child to try out colour mixing of their kind.
Play with these bath paints in a tub, a sink or in a bathtub. As the main ingredient is shaving foam, it is super easy to clean up after play. Just wash it all away with water!
Homemade chalk paint
Making chalk paint at home is so easy and creates a great sensory play material for toddlers. An interesting aspect is the texture of the chalk paint changes.
At first, it has a very paint-like appearance, spreads easily and gives a very transparent look to what you draw.
As it dries, the picture takes on a more chalk-ish look and begins to look a lot more like a solid block of colour. When completely dry, you can just dust it off with a piece of cloth and blow the powdered colour pigment particles away.
To turn it into a science lesson, ask your child if she knows why the texture looks so changed? Introduce her to the idea of evaporation and what happens during the process.
Homemade scented paint
You will quickly realize how popular this homemade paint-making recipe will become with your child, and you of course. To make scented paint, all you need is your choice of paint and a selection of fragrances to add.
For a beautiful lavender shade, for instance, chop a few leaves and buds from a lavender plant and add a little purple water-based paint. Leave it overnight. In the morning, just stir the mixture and inhale the pleasant aroma of lavender and paint a shade that you may not have seen before.
To a bowl of light green paint, add mint leaves your child has found in the fridge. This will result in green paint with a gentle fragrance of mint when you use it to paint on paper. Even a whiff of it will leave behind a memory of green you are not likely to forget anytime soon.
Ever thought of adding a grated rind of a lemon to the yellow paint. It will be a refreshing whiff of lemon that is released with every stroke of the brush on paper.
How about a grated peel of an orange with a little orange paint as a base. You will be releasing a refreshing scent of the summer filled with the fragrance of orange.
Each scented pot of paint you create can be used immediately. Or when left overnight to brew in a sealed container in the fridge, give the container a little shake and open the lid. You will release a fragrance with every stroke of the paintbrush
While the fragrance may not remain on paper for long, the memory of this in-the-moment, will let you enjoy-the-process sensory experience and make it linger for a long time to come.
About Abrakadoodle
Art education at Abrakadoodle creates learning experiences you can use to inspire children to think different, be innovative, and devise ways that teach about interesting things found in the real world. Changing the way children discover and imagine. Ignite their minds to think, play and learn like never before.
If you like to enrol your child in our children’s art classes or participate in cognitive learning activities, give Abrakadoodle a call. Or better still, make an appointment with the head of a centre near you.
Get hands-on exposure to an experience that will make you see art in a way that adds value to a child’s life.
Please note: Abrakadoodle classrooms are thoroughly sanitized every day — the tables, the chairs, the children’s activity stations and everything else the child might touch is made safe and clean. They also wear a mask, wash their hands frequently, and practice social distancing.
Frequently Asked Questions
You may also like

Simple Acrylic Painting Tips For Beginners

How To Inspire Your Child To Begin Painting On Canvas
